


© uma Schreibgeräte Ullmann GmbH


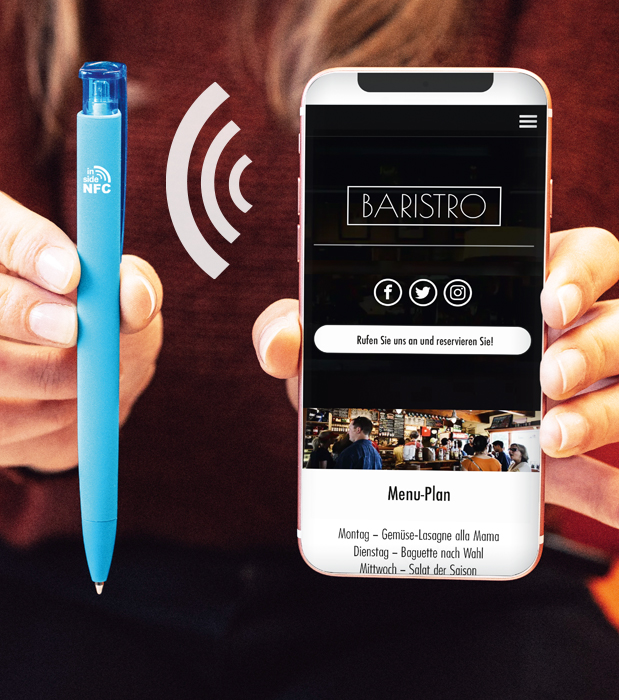
Nahfeldkommunikation (Near Field Communication), kurz NFC, ist ein internationaler Übertragungsstandard zum drahtlosen Austausch von Daten über kurze Distanzen. Zur Datenübertragung per NFC wird das Smartphone oder Tablet an einen vorprogrammierten NFC TAG gehalten, der dann zum Beispiel eine bestimmte Anwendung oder Funktion im Gerät aktiviert. In den uma inside NFC PENs sitzt der NFC TAG direkt unter dem inside NFC Logo. So wird die unkomplizierte Übertragung der Information auf das Smartphone oder Tablet sichergestellt. Verbinden Sie analoges Schreiben und Werben mittels der uma inside NFC PENs mit der interaktiven Welt.


Mehr als nur eine elektronische Kontaktdatenübermittlung bietet die uma BusinessCard Lösung. Gestalten Sie Ihre CI-konforme elektronische BusinessCard und übermitteln Sie Ihre Daten schnell und unkompliziert mit den uma® inside NFC PENs.
Mit dem NFC BusinessCard Service erhalten Sie Zugang zu einer webbasierten Datenpflege Ihrer BusinessCard Kontaktdaten und eine individuelle Gestaltung Ihrer persönlichen BusinessCard.

Mit Ihrer neuen schreibenden Visitenkarte können Sie digitale Inhalte transportieren. Das kann z.B. Ihr Kontakt als vCard, Ihre Website, Dokumente oder Social Media Seite sein. Alternativ nutzen Sie das Schreibgerät zur Promotion Ihrer App, Videos oder Veranstaltungen. Perfekt für den Einsatz im Aussendienst, auf Messen oder für Beratungsgespräche. Per einfachem Scan übermitteln Sie schnell Ihre Daten und verbinden haptische Werbung mit der interaktiven Medienwelt.

Bei Ihrer uma® BusinessCard können nicht nur Kontakte gespeichert, sondern auch verschiedene Daten oder Dokumente, wie zum Beispiel Preislisten und Firmenpräsentationen oder auch Videos transportiert werden. Die Informationen können über einen Webzugang permanent aktuell gehalten und gepflegt werden. Somit ist der Inhalt von der Ferne steuerbar und auch messbar.
Visitenkarte digital aufgewertet
Eigenständig programmierbar
Individuelles hochwertiges Design
Einfacher Download bzw. einfaches Übertragen von Kontakten + Daten
Anhang von Dokumenten möglich (Kataloge, Firmenpräsentation, Videos…)
Von der Ferne wartbar
vCard integrierbar
Aktionen direkt ausführbar
Verwendung von Google-Maps zur mobilen Navigation
Änderungen in Echtzeit auf der Karte sichtbar
Keine App erforderlich
Messbar: Auswertung der Scan-Statistik
Mit dem inside NFC-Chip können Sie beispielsweise Ihre Website direkt weitergeben, aber auch aktuelle Neuerungen oder Veränderungen hier hinterlegen. Auf Wunsch können Sie den NFC TAG selbst mit Ihren Ideen bespielen. Nutzen Sie die variablen Einsatzmöglichkeiten.

Kontakt
Fritz-Ullmann-Weg 3
77716 Fischerbach
Deutschland
|
Telefon: |
+49 (0)78 32 / 707-0 |